Wednesday, February 16, 2011

Workshop in Progress- oranges

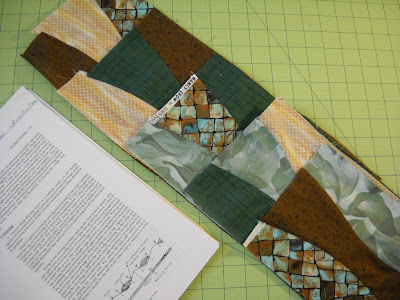
I have the top and the backs pieced for the two bunk beds. The back is pictured on the right and the front is on the left.

The back could be better as far as proportion and colour matching but this is about progressing in my design capabilities. Always room for improvement.

The top can be enhanced with some oranges (circles). I am thinking I could apply some fusible to the fabrics shown above and cut out various sized circles and sprinkle them on the strippy top.


These are on an orange background and are darker. There is quite a bit of overlap. The biggest would finish about 5".

This background is white with lighter motifs. These average about 3" but do not overlap at all.


Then there is a coordinating stripe.

My first choice is hand applique which I like but that would not improve my machine applique skills. I could satin stitch the raw edges or I could do some blind stitching around turned under edges.
But...
Is the top busy enough already?
Are the circles big enough, too small?
Should I sprinkle a dozen or so all about or cluster them in the lower quarter?

oye! Time for a juice break!

A rose by any other name


I had never named any sewing machines before I had Berninas. But as I began to really get into sewing as a joy rather than a necessity I realized 'hugging' your machine and making it happy was fun. My first Bernina was a plain machine and I called her Pat. The second was fancier so she needed a fancier name. Ingrid seemed to fit her, a nod to her heritage. Lots of gals call their Bernina's Bernie but I've not felt the gender connection. When I found carrying Pat about to be too much I went for a light, cheap and portable machine for 'take out'! Mini was an easy fit. She is a Minimatic from 1972 with very few frills but I didn't need any. She is no Featherweight but she fit all of Pat and Ingrid's feet and is up for travel. I had got one of those wheeled carts that were designed for scrapbooking and I'd slide her in without her case and we were good to go. The problem was I was using two hands to get her downstairs and then down the steps. Grass and gravel, not to mention snow banks began to frustrate me so she is back in her case and my right hand gal as I navigate paths, curbs and steps. I might add that a full tote in my left hand balances things out but I could use Bernina's free hand system to get doors opened.
Now my new machine is heavy. A big girl, she won't be doing road trips. But she is not a Bertha. She is classy, a high stepper, and I think she would like all kinds of fashionable fun . I think she is a tad disappointed that her new mistress is not too quick on the draw and pretty conservative. I think she'll be taking me to some festivities where we'll flamingo dance, flirt and watch the fireworks! All in the playroom, of course, but... whoo! She's a Nina!

Tuesday, February 15, 2011

A real red letter day!

Well, this is an old free motion embroidered Sun Bonnet Sue that I wanted to show for the red heart day. It is done the new fashioned way on my old 'old fashioned' sewing machine; two threads in one needle and I just followed my penciled line. Totally fun.


I had a 1260 Bernina, a workhorse and excellent for MQing. I'd gotten an used 1630 for fancy stuff. I was happy. I really was. But I'm a machine quilter and all those bed quilts were beginning to affect the body as I held things up to move thru a small throat space. I began to think about that bigger throat space. When the 8 series first came out I thought I don't need all the bells and whistles. But that throat space. ? Anyway, I thought "no way"! A few years later I was at Bernina Club and sat beside a machine with that coveted throat space. ?? No Way! Then a few months ago I saw the Free Motion Couching Foot in action. WHOA! YES! But it isn't available for my older machines. Well it turns out that foot number 43 is very expensive because I began to talk to my dearie about my options. ??? Foot number 43 kept me awake as I thought about parting with my girls; 4 digit numbers and old fashioned, and trading them for some flashy, 3 digit, state of the art computer that happens to sew. It doesn't make coffee but the timer tells you when its ready! vbsigh I'm sure they'll go to lovely homes. Notice poor old Mini down on the floor. She is an old manual Bernina I carry to classes. I didn't mean to just shove her over like that. ;^)


The 820 arrived Friday but I was babysitting the almost 3 year old and I didn't think he was conducive to undivided attention for my intro lesson. lol


Nor did I think the bathroom flooring day was a good day to be AWOL. Old houses are always up for surprises during renovations and this was typical. After a long day we had the water back on, the toilet sitting pretty and the floor wrinkle-free. Only two blue words and maybe the grandson didn't hear them!


But Monday arrived and I spent 3 hours with Elizabeth, my wonderful dealer. I learned it all. At least I thought I did. The thing, oops sorry; Nina is a marvel. But she is a big girl and barely fit in my trunk. I was making 'get away from me motions' to any car that came too close all the way home. I did stop off at my dearie's work to say thank you as he rearranged a whole lot of budget for me to get it this year.
Today I got chores out of the way and rearranged some of the playroom. She is bigger and heavier and my old cabinet won't work which is okay as I now like to sew standing or sitting on a high stool. So I will add some kind of top extension to get her table to flow onto my big craft table after I experiment a bit.
What was perfectly simple at the store turned a little more exciting when I got home. First I had a spool achieve lift off as I wound a bobbin. Operator error! I anticipated some trouble with the new bobbin system but second try WORKED! But threading was surprisingly frustrating. It wouldn't do the automatic needle threading because something was wrong with the pathway. awk! I'm not sure what I finally did but I hope I can repeat it !

The regular foot sewed fine. Odd to not pull ahead and cut the threads but it is now a touch of the button. But I want my 1/4 inch foot so I can finish up my placemats. She sews but something has her knickers in a knot. I have some swearing on the screen. Red swears, not blue ones. lol

I've sent the picture to Elizabeth and she wants a little more detail. Ahem, I hope I can articulate what I've done did.

NOT a lot of achievement. I do have to admit that my old girls would've had the job done long ago, but Nina will settle in and she and I will be best buds in no time at all.

EDITED: Ah, she was saying straight stitch only or the needle will break and you'll be swearing!

Monday, February 14, 2011

A Happy Valentine's Day


A Red Letter Day Indeed! whoo hoo! My Dearie is THE very best!

Saturday, February 12, 2011

Have a look

This is the colour palette for the 3CS Colour Palette for the month.

When I saw the colours I knew I wanted to make my spring placemats with these fabrics. I have 8 of the 12 place mats sewn together. Four more to go and then the MQing. The shape is a bit odd but I needed them to be more square so I could get 12 people at the table.


Very busy day here. My bathroom flooring is finally going in.


Good thing my handy dandy hubby has a helper. It gives me a minute to post my own progress report! And I hope to have a very exciting report on Monday.

Friday, February 11, 2011

Child's play

I may have to change my name to my friend's blog, Naptime Quilter. But being a grandma rather than a mum means I'll not be quilting during nap time but joining the bed and blankie brigade. The good news is that 30 minutes does it well enough for me. lol

Journal quilt number 6 is the crayon drawing I made.

Now Josh seems to like the back the best. ???

We had spread an eye spy quilt I made way way back when I first met Cheryl out on the hallway floor. (see first photo) We had all shared novelty prints that represented the 26 letters of the alphabet and then I hand appliqued lower case letters on mine. I had lots of time as grandchildren didn't arrive till some years later. But when Josh saw the crayons on the back of my quiltlet he went over and studied the eye spy quilt which has C for crayon and yup, it is the same fabric. (It is gonna be hard to fool this little guy!) LOL

Needless to say I am a bit behind on the colour palette placemats and I need to be sewing while the little guy snores. SHHHHH!

Thursday, February 10, 2011

Good ol' college try

The 3CS has a number of challenges that I like to participate in. I am hampered a bit by being on dial-up so some tutorials can be an issue. The Technique of the Month is transferring colour and I tried a few things but I need to get the transfer medium. My trip to the city has been delayed so I won't meet that deadline but I did do some 'fooling around' with various things including a new box of crayons.

That didn't work so I wondered 'what if...'

I found the Faber-Castell PITT artist pen worked the best on fabric and I drew a border and then filled it with a little scene. Now this may not look like much but I'm actually impressed. Then I got my iron working on the fabric to heat it up and used several of my 64 colours to add some colour. I ironed the cloth with parchment paper between the iron and my drawing. Kinda cool! oh, I guess it should be, Hot Stuff! lol

The Flicker Group for the TOM is here.

The 3CS Colour palette challenge is a favorite combo of mine. I wanted to revisit some curved piecing so I dug out some old class notes. I did these with no pinning.

This is a little preview and I should have my spring place mats ready for viewing tomorrow.

Wednesday, February 9, 2011

I found the oranges!


While clearing off the layers of projects on my design wall so I could lay out the blocks, sashing and set in triangles for the last WIP I posted about, I unearthed an old WIP.

These are for the bunks in the Sunshine room. The tops were done and the backing option laid out. Hmm, I need to finish these up.

I played around with a few more options after I squared up the two tops. I have lots of the dots. I divided it in half and that'll be the bottom.

I have one metre of the safari print and I cut strips and again divided them half for each quilt. I decided leftover strips from the front were too busy.

By the time I was done I decided that the stripe may work for a binding and the gradations are again too busy so I'm figuring maybe just the lighter fabric which is similar is colour to the animal print.

Comments are most welcome, especially "what if...". Can you see something I can't?
I need this decided, done and off the wall so I can get the front room quilt up and progressing.


EDITED: The strips of orange prints is the quilt top. I have laid the backing options alongside to see how they play together. I'm trying to also decide if I can 'easily' applique circles randomly onto those strips. Sorry I can't find my back link to the original post for these tops as I got the original idea from SueSewn and she had the circles on hers.

Tuesday, February 8, 2011

Nix the Niches?


I am back working on my Altered Book 101 class. This niche was making me drag my heels a bit but I had it on my list of five things to do and it's number was up! Well, I'm going to be glad that I made a niche, but I'm definitely not making another niche this deep. They are not in the instant gratification category. A tad labour intensive. ;^)

First I sectioned off the front pages so I could work on the block of pages at the back of the book that I had reserved for the niche. I used the gel medium to seal up the edges opposite the spine. I clamped it tightly. Then I did the two ends and clamped them. I propped the whole niche section upright and allowed it to dry over night.

The clamps stuck a bit to the paper but I will be prepping the pages later with gesso and colour. I did use my nail file on some of the roughness.

Then I drew a square on the loose page in front of my block of pages which will be the niche. This is the shape for the niche. I used an exacto knife because that is what I had. I cut along the penciled line, working against my acrylic ruler and from each corner.
Then I tucked that first page in with all the foremost pages. It will be used as a window to partially reveal the contents of the niche.

And I began to remove the cut squares. I cut and removed and I cut some more. And there were lots to remove.
Growing weary in well doing I tried my handy dandy rotary cutter. Still, I needed the exacto knife for the corners. Actually I broke the very tip of the blade and I probably should have put another one in but we did 'getter done'! Perhaps hubby's retractable knife would have been better.

I had placed a mat between the block of pages which make the niche and the book's cover. I finally broke thru, cleaned up all the debris, used my nail file on a rather ragged edge and began to apply the gel medium all along the inside edges.

This is a bit tricky to get the clamps positioned but once again they hold things tightly in place as the edges dry and seal. The niche will then dry. It is done in advance because that is easier. We'll revisit the niche later. Next up is colouring the pages. Much more exciting than clear glue!!! Whoo hoo! I have jumped over that wall of procrastination.

Friday, February 4, 2011

Can this trash be saved?


These Journal quilts are full of surprises! My theme was garbage, anything we'd be throwing away. I had scraps left from a quilt project. I had a flimsy piece of white fabric. I had some phone books to throw away. I have been seeing lots of projects with selvages lately. I'm not sure I'm for saving all my selvages but I can come up with a few rather than throw them away. I have some paints that need to be used before I feel like I really did just throw my money away.

So, here is the process and reclamation from the garbage.

I used a gel medium to glue down bits of paper from the yellow pages of the phone book. I chose the sewer section which had a lot of non fabric advertisements. lol

I learned in my research that the first colours should be the opposite of your final plan. I tried to use a light hand over the papers even though it is a transparent paint. My 'oh' was kinda hesitant. :0 I also want to add a strip of green mulberry paper to separate my fabric strip.

I'm getting ready to add the finishing colour.

I'm sorry I was so dismayed at the arrival of 'midnight' I forgot to take a photo. But this is also where I got really nervous as things were getting out of hand. The Setacolours were ordered after a class I took a number of years ago. With basic colours you can mix everything you need. Uhm, works in theory but I am thinking I'd rather have smaller bottles and lots of options. yikes! Where is the garbage?

Thank goodness I got some Shimmer Pearl. (I shoulda got white as well.) So I covered a whole lot over and slapped another piece of of the yellow pages on top. Trust me, this was my trying to redeem my mess and it looked quite bad. So I shimmered a whole lot more!

well, that worked and I was off again. I'm wanting yellow and blue. I was so intent on not making garbage I forgot photos and focused on process.


I'm not unhappy but it certainly wasn't quite what I had in mind. Except for the heavy breathing and the heart palpitations, it is kinda fun and as my learning curve flattens out I'm sure it will totally be fun!


So here is my garbage!


This is probably a truer representation than the mellow photo I posted at the beginning.But I'll be posting the mellow version to the 3CS Journal Quilts flicker group!

Thursday, February 3, 2011

AB 101 Covering


In the review I see I forgot to strengthen the inside cover and first pages which are attached to the cover rather than the spine. I had gotten the Mulberry paper so all I had to do was apply some gel medium after I chose the colours.

I liberally spread the gel medium right into the centre and then placed the mulberry paper, brayered it down and added more gel.

The two pages got a smaller piece of the green.


The inside cover got 2 pages of the purple which I overlapped in the centre for extra strength.

The back cover is where the niche goes.
I forgot the darn plastic clamps from my son in law while I was there yesterday. He has lots of cool tools while my dear farmer is of the old school called 'make do' and has old, dirty, rusty and not so state of the art. But I don't think my clothes pins will do the job so I await the DSIL's cool clamps. Or I can add them to the weekend's grocery list!

In the meanwhile I played with gel medium, paints and paper for my Common Threads Challenge. The theme is garbage and right now it is kinda looking like that is where it will end up. lol The base fabric is drying after its 4th layer of paint which will likely save it from incineration! I'll work on this next journal quiltlet tomorrow.

Tuesday, February 1, 2011

Against the wall!


Cleaning has been a bit more thorough as I am on the hunt for a missing toy that has probably rolled off into some corner.

I have the big mirror leaning against the wall ready for rehanging and the second coat has been applied to the 2 little chairs. I did decide to do the horizontal mirror that hangs above the table and it will need another coat.
I will be clearing the various layers from the design wall and setting priorities. First will probably be the WIP so I can show the finish to all the helpful bloggers who added some insight into its finished state. Thanks muchly!
But what is really against the wall is my Altered Book 101. :( It is languishing after having gotten off to a great start. Eggs or Else !!! My dear hubby says that some projects hit a wall and then it requires something extra to tackle it, get it done and on to the next thing. The altered book requires a niche in the back. True it is optional but I decided to do it not realizing it would take me to the wall. LOL But my focus this week is to get it done. Hopefully I can have something to show on Thursday.
And BTW, taking those mirrors down has shown the walls for the condition they are in. Also time to step up the home dec department!